WordPress, as a popular content management system, empowers countless websites and blogs. However, like any other software, it comes with its own set of challenges and error messages. One such error that developers often encounter is the dreaded “Cannot use object of type as array” warning in PHP. In this blog, we’ll explore the root cause of this issue, understand why it occurs, and provide practical solutions with code examples to help you tackle it effectively.
Understanding the Error
The “Cannot use object of type as array” error occurs when you try to treat an object as an array in your PHP code. This happens because objects and arrays are distinct data types in PHP, and you cannot directly access object properties or methods using the array syntax. This error is particularly common in WordPress due to its extensive use of objects to represent various data structures.
Common Scenarios
1. Incorrect Array-Like Access to Object Properties:
$post = get_post(); // Returns an object
$title = $post['post_title']; // Throws the error
2. Misusing Object Methods as if They Were Array Functions:
$user = wp_get_current_user(); // Returns an object
$metaValue = $user['user_email']; // Throws the error
Solutions
1. Using Object Methods: The most straightforward solution is to use the appropriate methods provided by the object to retrieve the desired data. For example:
$post = get_post();
$title = $post->post_title; // Correct way to access post title
2. Converting Objects to Arrays: If you need to work with data in array format, you can convert the object to an array using the wp_object_to_array function:
In conclusion, handling the “Cannot use object of type as array” error in WordPress is a common challenge. But armed with the right knowledge, it’s a hurdle that you can easily overcome. By understanding the distinction between objects and arrays techniques, you can ensure your WordPress codebase remains error-free and efficient. So, the next time you encounter this warning, you’ll know exactly how to resolve it and continue building amazing websites on the WordPress platform.
WordPress is a powerful and versatile platform for building websites, but encountering PHP errors can be a common frustration for website owners and developers. However, these errors can disrupt the functionality and appearance of your site, potentially leading to a poor user experience. In this blog, we’ll walk you through the process step by step.
Why PHP Errors Occur in WordPress
PHP errors occur when there’s an issue with the code on your WordPress site. Also, they can range from minor warnings to critical errors that prevent your site from functioning properly. Some common causes of PHP errors include:
Syntax Errors: These occur when there’s a mistake in the code’s structure, such as missing semicolons or brackets.
Incorrect Function Usage: If you’re using a function incorrectly or passing the wrong parameters, then it can trigger an error.
Undefined Variables: Using a variable that hasn’t been defined or initialized can lead to errors.
Plugin or Theme Issues: Incompatible or poorly coded plugins or themes can introduce errors to your WordPress site.
Turning Off PHP Errors
While it’s important to fix PHP errors for optimal site performance, there may be instances where you want to temporarily turn off error reporting, especially when working on development or testing environments. Here’s how you can do it:
1. Editing the wp-config.php File:
The wp-config.php file is a crucial configuration file for your WordPress site. To disable PHP error reporting, follow these steps:
Access your website’s files: You can use an FTP client or access your site’s files through cPanel, Plesk, or your hosting provider’s file manager.
Locate wp-config.php: Navigate to the root directory of your WordPress installation and find the wp-config.php file.
Edit the file: Open wp-config.php in a text editor and add the following code just above
Save and upload: Save your changes and upload the modified wp-config.php file back to your server.
2. Using a Plugin:
If you’re uncomfortable editing files directly, you can achieve the same result using a plugin. Here’s how:
Install a plugin: In your WordPress dashboard, go to ‘Plugins‘ > ‘Add New’ and search for a plugin like “Disable WP Error Reporting.”
Install and activate: Install the plugin and activate it.
Configure the plugin: Most error-reporting-disabling plugins have minimal configurations. Once activated, the plugin will automatically turn off error reporting.
Remember, while disabling error reporting can be helpful for development and testing purposes. But, it’s not recommended for a live website. Make sure to re-enable error reporting and address any issues before launching your site or moving it to a production environment.
A “Failed to Load Resource” error occurs when a web browser is unable to retrieve a specific resource required to correctly render a web page. These resources can include images, stylesheets, scripts, fonts, and more. When these resources fail to load, it can lead to a broken or incomplete webpage, negatively impacting the user experience and potentially causing functionality issues.
Common Causes of the Errors
Incorrect File Paths: One of the most common reasons for this error is a wrong file path specified in your WordPress theme or plugin. Double-check that the resource file paths are accurate and point to the correct location.
File Permission Issues: Improper file permissions can prevent the browser from accessing necessary resources. Ensure that the files have the correct permissions (often 644 for files and 755 for directories) to allow them to be loaded.
HTTP to HTTPS Migration: If you recently migrated your site from HTTP to HTTPS, mixed content issues may arise, causing some resources to fail to load. Make sure all resource URLs are updated to use HTTPS.
Plugin or Theme Conflicts: Conflicts between plugins and themes can lead to failure in resource-loading. Temporarily deactivate plugins or switch to a default theme to identify the culprit.
Server Configuration Problems: Server misconfigurations, such as incorrect server settings or limitations, can prevent resources from loading. Moreover, check server error logs for any clues.
Caching and CDN Issues: Overzealous caching or improperly configured Content Delivery Networks (CDNs) might lead to resource loading problems. However, clear caches and review CDN settings to ensure proper resource delivery.
Steps to Resolve the Errors
Check File Paths: Review the file paths of resources in your theme files or plugins. Also, ensure they are correctly specified and reflect the actual location of the resources.
Update URLs: If you recently switched to HTTPS or made changes to your site structure, update all URLs to reflect the changes.
Verify Permissions: Make sure that files and directories have the appropriate permissions. Thus, incorrect permissions can prevent resource loading.
Deactivate Plugins and Themes: Temporarily disable plugins. Also, switch to a default theme to identify whether conflicts are causing the issue. However, gradually reactivate plugins to pinpoint the problematic ones.
Inspect the Browser Console: Use the browser’s developer tools to inspect the console for specific error messages. Besides, this can provide valuable insights into the root cause of the problem.
Server Configuration Review: Check your server settings and error logs for anomalies. Also, server misconfigurations may be contributing to the error.
Clear Caches and CDNs: Clear any caching mechanisms and review your CDN settings to ensure they are not causing resource-loading failures.
In conclusion, Failed to Load Resource errors can be frustrating, but not insurmountable. By following the steps, you can effectively diagnose and resolve these errors. Also, ensuring your WordPress website runs smoothly and provides an optimal user experience. Regular maintenance, cautious plugin usage, and a keen eye for detail will help you keep these errors at bay and maintain a high-performing WordPress site.
Encountering a “404 Page Not Found” error on your WordPress site can be frustrating for both site owners and visitors. In this blog, we’ll guide you through troubleshooting and resolving this issue. Moreover, by identifying the root causes of implementing practical solutions, user will get a seamless experience. Let’s dive in and fix that pesky 404 error!
Understanding the Causes of the 404 Error
We’ll explore the common reasons behind the “404 Page Not Found” error in WordPress. Whether it’s a broken link, permalink structure issue, or misconfigured server settings, we’ll help you pinpoint the exact cause affecting your site. Also, understanding the root cause is crucial for implementing the appropriate fix.
Troubleshooting the 404 Error
We’ll provide a step-by-step troubleshooting approach to help you diagnose and resolve the error. We’ll cover methods such as checking for broken links, verifying permalink settings, and investigating server-related issues.
Fixing Broken Links and Permalink Structure Issues
Broken links and incorrect permalink settings are common culprits behind the 404 error. Besides, we’ll demonstrate how to identify and fix broken links using WordPress plugins and manual methods. Additionally, we’ll guide you through configuring and updating the permalink structure to ensure proper URL routing and avoid 404 errors.
Code Example 1: Checking for Broken Links To identify and fix broken links, you can use the following code snippet in your theme’s functions.php file:
function check_for_broken_links() {
if (is_404()) {
// Log or handle broken link here
}
}
add_action(‘template_redirect’, ‘check_for_broken_links’);
Code Example 2: Updating Permalink Structure To update the permalink structure and flush rewrite rules, you can use the following code snippet in your theme’s functions.php file:
function update_permalink_structure() {
global $wp_rewrite;
$wp_rewrite->set_permalink_structure(‘/%postname%/’);
$wp_rewrite->flush_rules(true);
}
add_action(‘init’, ‘update_permalink_structure’);
Fixing Server Configuration Issues
Sometimes, server-related configurations can trigger 404 errors. We’ll delve into server issues like incorrect .htaccess rules, server caching problems, and incompatible server modules.
Code Example 3: Fixing Server Configuration Issues If the 404 error is caused by server configuration, you can add the following code to your site’s .htaccess file to fix common issues:
# Fix for missing trailing slash on directories
RewriteCond %{REQUEST_FILENAME} -d
RewriteRule ^(.+[^/])$ %{REQUEST_URI}/ [L,R=301]
# Fix for non-www to www redirection
RewriteCond %{HTTP_HOST} ^example.com$
RewriteRule ^(.*)$ http://www.example.com/$1 [R=301,L]
Preventing Future 404 Errors
Prevention is better than cure! We’ll provide practical tips on how to prevent future 404 errors in WordPress. Besides, implementing proper link management practices to utilizing redirection plugins and monitoring tools. Also, we’ll equip you with the knowledge and tools to keep your site error-free.
Don’t let the “404 Page Not Found” error frustrate you or your website visitors. With our comprehensive guide, you can troubleshoot, fix, and prevent this common issue in WordPress. Follow the step-by-step instructions, leverage helpful code snippets, and ensure a seamless browsing experience on your WordPress site
Have you ever tried to update your WordPress website and encountered the “Briefly unavailable for scheduled maintenance” message? This message can be alarming, but it’s actually a normal part of the WordPress update process.
During a WordPress update, the system puts your website into maintenance mode to prevent any issues from occurring during the update. Once the update is complete, WordPress will automatically take your website out of maintenance mode. However, if the update process is interrupted for any reason, your website may remain in maintenance mode, resulting in a maintenance error.
Fortunately, there are a few simple steps you can take to fix this issue and get your website back up and running.
Step 1: Access Your Website’s Root Directory
To begin, you will need to access your website’s root directory. This can typically be done using an FTP client or through your web hosting control panel.
Step 2: Locate the “.maintenance” File
Once you have access to your website’s root directory, look for a file called “.maintenance”. This file is responsible for triggering the maintenance error message during the update process.
Step 3: Delete the “.maintenance” File
To fix the issue, simply delete the “.maintenance” file from your website’s root directory. Once the file has been removed, your website will be taken out of maintenance mode and should be accessible once again.
Step 4: Check Your Website
After deleting the “.maintenance” file, check your website to ensure that everything is working properly. If you encounter any issues, you may need to troubleshoot further or seek assistance from a WordPress expert.
In conclusion, encountering this message in WordPress can be frustrating, but it’s usually an easy fix. By following the steps outlined above, you can quickly resolve the issue and get your website back up and running.
Remember, it’s always a good idea to back up your website before making any changes to your website’s files or database. This will ensure that you can easily restore your website if anything goes wrong during the troubleshooting process.
If you see the ‘Error establishing a database connection’ notice on your WordPress website, it means that WordPress cannot connect to the database. This can be caused by a number of things, which can make it difficult for beginners to troubleshoot. However, there are some easy ways to fix this error and get your website up and running again.
Step 1: Check Your WordPress Database Credentials
One of the most common reasons for a database connection error in WordPress is having incorrect database credentials. If you’ve recently moved your WordPress site to a new host, this is likely the cause.
Your WordPress database credentials are stored in the wp-config.php file, which contains essential settings for WordPress, including your database information. If you haven’t edited this file before, check out our guide on how to do so.
Please find the following lines in your wp-config.php file and edit them according to your database information.
/** The name of the database for WordPress */
define( ‘DB_NAME’, ‘database_name_here’ );
/** MySQL database username */
define( ‘DB_USER’, ‘username_here’ );
/** MySQL database password */
define( ‘DB_PASSWORD’, ‘password_here’ );
/** MySQL hostname */
define( ‘DB_HOST’, ‘localhost’ );
You need to make sure that the information for the database name, username, password, and database host is correct.
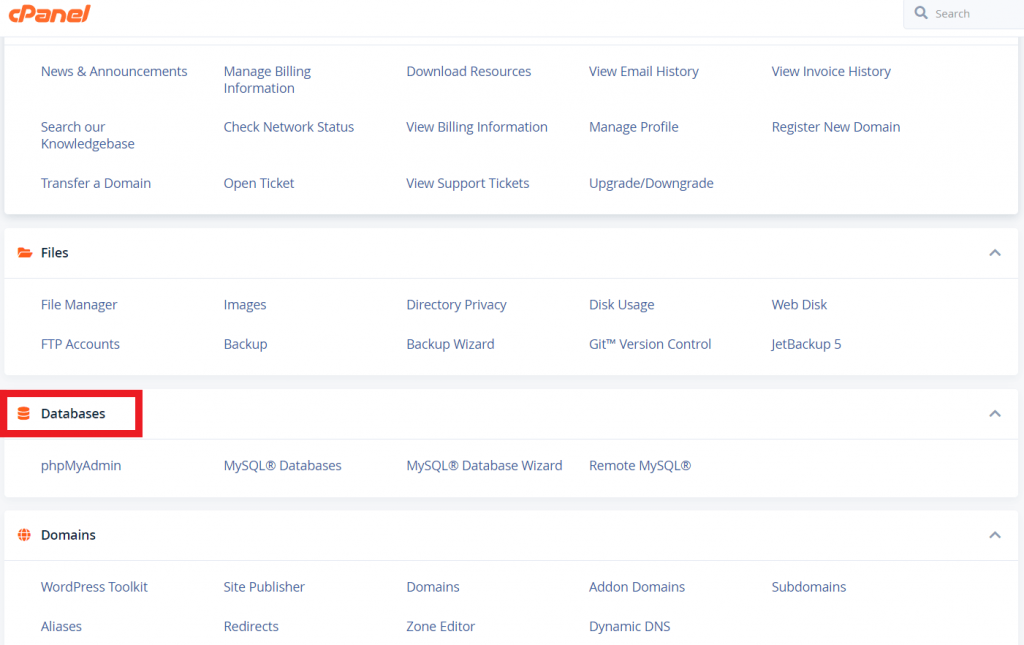
You can confirm this information from your WordPress hosting account dashboard. Simply log in to your hosting account and click on MySQL databases under the database section.
If you are using cPanel, you will find the Database section. Here you can edit the database information.
Below there, you will find the database users and links to change the user password.
Try visiting your website again to see if the error has gone away. If you are still seeing the database connection error after confirming your database name, username, and password, then this means that something else is wrong.
Step 2: Check Your Database Host Information
If you’ve checked the database login credentials and fixed any errors, but the Error Establishing a Database Connection message persists, check your database host information next.
Your WordPress database host is the server that stores all the information for your website. In most cases, this will be localhost, but some WordPress hosting companies use separate servers. If this is the case, you’ll need to contact your hosting company to get the correct database host information.
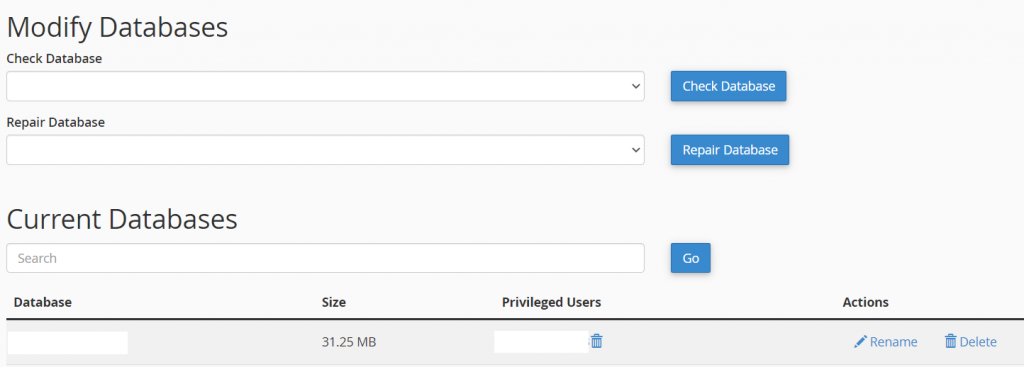
Step 3: Repair Your WordPress Database
If you are getting an error on the backend of your site that says something like “One or more database tables are unavailable. The database may need to be repaired,” you will need to repair your database.
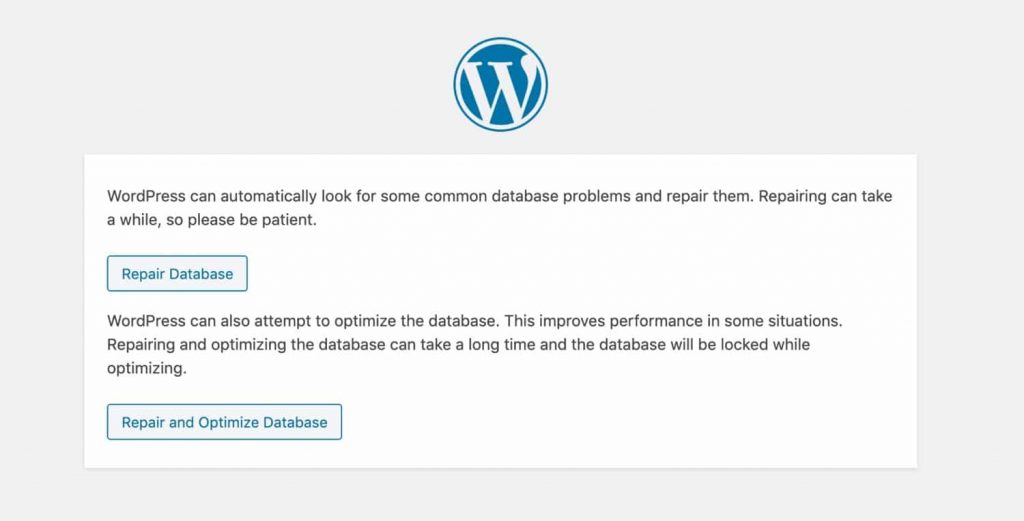
To access it, open up your wp-config.phpfile and add the following code at the end:
Note: You can access the database repair page without being logged in. Once you’re done repairing and optimizing your database, make sure to remove this code from your wp-config.php.
Step 4: Check if Your Database Server Is Down
If you are still facing trouble connecting to your WordPress database, your server may be down.
There are several reasons your database host or server might be experiencing issues. It could be due to a high volume of traffic, an outage with the hosting provider, or maintenance.
Too many simultaneous connections: Too many people are trying to access the database at the same time. That can happen if there are too many visitors to a website at once. It can also happen if someone is trying to hack into the system.
Problems with another site on your shared hosting server: Another website on the same server as yours may contain problems, which can cause your website to run slower or have other issues.
Hardware troubles: Your database server may contain hardware issues, which can cause problems with your website.
If your site is running slowly or seeing error messages, the best thing is to contact your hosting provider to see if the problem is with your server.
Other Solutions That Have Worked for Users
If the troubleshooting tips mentioned above did not fix the database connection error on your website, you may try these additional actions. For some users, these steps have helped resolve the database connection error on their websites.
Update WordPress Site URL: You can try updating the WordPress site URL using phpMyAdmin. Simply access phpMyAdmin from your hosting account dashboard, and select your WordPress database. Then enter the following query:
UPDATE wp_options SET option_value=’Your Site URL’ WHERE option_name=’site-url’
Reboot your web server: This one might seem a little basic, but sometimes the simplest solutions are the most effective. If you host your database on your own server, try turning it off and back on. This will restart your web and database server which may fix some temporary glitches causing the error.
Ask for help: If you are still having trouble with your WordPress site, try reaching out to your web hosting company for help. They should be able to assist you in troubleshooting the issue or even fix it for you.
Dealing with Fatal Errors in WordPress happens to everyone eventually. If you have a multimedia-rich site, then the standard configuration for WordPress will not meet your needs and at some point, you will experience one of the following errors: “Fatal error: The allowed memory size of xxxxxx bytes exhausted” and “filename.jpg exceeds the maximum upload size for this site.”
There are some solutions given for the Fatal Error. Try to follow the steps and hope that you can solve your problem.
1. Edit your wp-config.php file:
wp-config.php is one of the most important WordPress files because it contains your base configuration details. You’ll find it in the root of your WordPress file directory. To edit the memory limit and upload limit, look for this line:
define(‘WP_MEMORY_LIMIT’, ’32M’);
Modify the second parameter by increasing it. As a PHP memory limit of 128M should be more than enough.
define(‘WP_MEMORY_LIMIT’, ‘128M’);
Save the file and you’re done. You may need to increase it again if you’re still getting the fatal error, but don’t go overboard or you may crash your server.
If you’re still having the memory limit fatal error in the admin area of WordPress, then you’ll need to modify a different line in your wp-config.php file. To increase the WP memory limit for the administration area look for this line and increase it:
define( ‘WP_MAX_MEMORY_LIMIT’, ‘256M’ );
Admin tasks require more memory, so you’ll need to set it much higher. Double the number you set for WP_Memory_Limit.
2. Edit your php.ini file:
In the event that modifying your wp-config.php file doesn’t address the problem, you’ll have to address the issue within your server settings instead of within WordPress.
If you’re using shared hosting, you will not be able to access your php.ini file, so see the next option instead. If you do have access to php.ini, you’ll most likely find it in the root folder, but the location of the file will vary by host.
To increase the PHP memory limit and upload limit, change these lines in php.ini
Changing the value of max_execution_time will limit the amount of time for a PHP script to run. If the PHP script exceeds the set value (seconds), it will stop the script and report an error.
In many cases, the values you enter should get larger as you go down the list from lines one to three. The upload_max_filesize should be the smallest while the memory_limit should be the largest. The median should be post_max_size. Before checking to see if the error is gone, make sure to clear your browser’s cache.
3. Edit your .htaccess file:
If you don’t have access to php.ini, then your last resort is to modify your .htaccess file. Your .htaccess file starts with a dot because it is a hidden file. If you don’t see it in your root folder, check to make sure that your file manager isn’t keeping those files hidden from view.
To increase the PHP memory, you’ll add the following to your .htaccess file:
If the PHP value memory limit has already been set, then increase it.
This website uses cookies to improve your experience. We'll assume you're ok with this, but you can opt-out if you wish.AcceptRead More
Privacy & Cookies Policy
Privacy Overview
This website uses cookies to improve your experience while you navigate through the website. Out of these, the cookies that are categorized as necessary are stored on your browser as they are essential for the working of basic functionalities of the website. We also use third-party cookies that help us analyze and understand how you use this website. These cookies will be stored in your browser only with your consent. You also have the option to opt-out of these cookies. But opting out of some of these cookies may affect your browsing experience.
Necessary cookies are absolutely essential for the website to function properly. This category only includes cookies that ensures basic functionalities and security features of the website. These cookies do not store any personal information.
Any cookies that may not be particularly necessary for the website to function and is used specifically to collect user personal data via analytics, ads, other embedded contents are termed as non-necessary cookies. It is mandatory to procure user consent prior to running these cookies on your website.