Login Settings
To configure Login options of your site go to: User Meta>>Settings>>Login.
Select one of User login by options from Username, Email and Username or Email. If Username or Email is selected, it means user can login with username or email by both.
Select a default Login Page. Leave login page as None if you don’t want to make one as default login page. In that case, user have to login with WordPress default login url. Choose one among your pages which should contain shortcode like [user-meta-login].
Make a Login Page automatically only by clicking Create page which contains User Meta Login Shortcode. This new created field named Login will be selected as Login page then. To disable WordPress default login url and enable front-end login page which you have just selected check Disable default login url.
Configure your login form with Login Form section. Check Disable lost password feature not to give the feature in login form. Check Hide registration link or the login form will contain a registration link at the bottom. Disable AJAX submit in login by checking Disable AJAX submit.
Choose a Reset Password page where users will be redirected when they want to retrieve or reset their password. Should select a page as you can’t leave Reset Password Page as None if your default login url is disabled. Can make a Reset Password Page automatically only by clicking Create Page. Then select the newly created page.
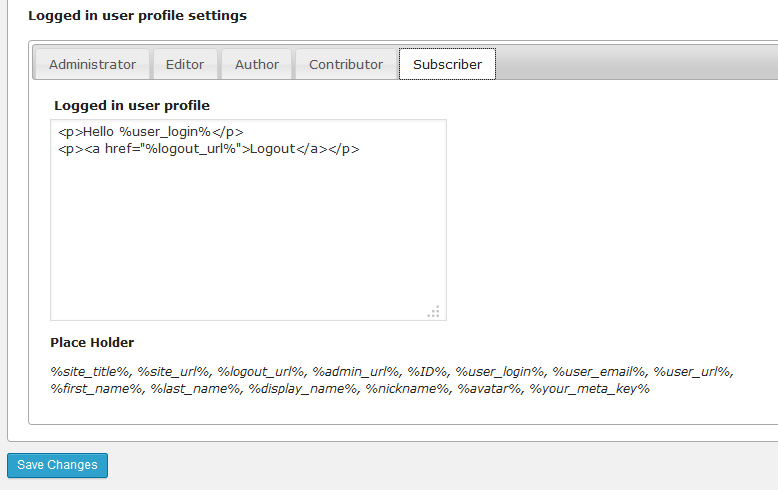
Set up Logged in user profile settings differently based on their roles. Set text and Place Holder here which will be shown when user is logged in.
Place Holders:
%site_title%
%site_url%
%logout_url%
%admin_url%
%ID%
%user_login%
%user_email%
%user_url%
%first_name%
%last_name%
%display_name%
%nickname%
%avatar%
%your_meta_key%
When you have done with all these, click Save Changes.


